


 Do you have a lot of shoes with a varied choice of color? try to make a shoe rack of blank walls and provide insulations such as book shelves to put your shoes. you can combine the color of your shoes to give the impression of art. the walls of your home that looks empty you can exploit to put your shoes according to your creativity. shoe rack is quite simple and beautiful when combined with some of your shoe color. you can put under the stairs, or anywhere you wish. Any woman dream to have a storage wall for all her shoes. When her husband have some woodworking skills that isn’t a problem. Although not all women have such men in their lives. There are other options to fullfil this dream. The most easy one is to get IKEA’s Expedit bookcase. Its shelves are perfect for the task and you really don’t need to do anytinng with it. There are four colors available and you can combine several such bookcases if you have a lot of space and need to accomodate a LOT of shoes.
Showing posts with label DIY. Show all posts
Showing posts with label DIY. Show all posts
Saturday, April 2, 2011
DIY Wall Shoe Storage | Creative Shoe Storage
Do you have a lot of shoes with a varied choice of color? try to make a shoe rack of blank walls and provide insulations such as book shelves to put your shoes. you can combine the color of your shoes to give the impression of art. the walls of your home that looks empty you can exploit to put your shoes according to your creativity. shoe rack is quite simple and beautiful when combined with some of your shoe color. you can put under the stairs, or anywhere you wish. Any woman dream to have a storage wall for all her shoes. When her husband have some woodworking skills that isn’t a problem. Although not all women have such men in their lives. There are other options to fullfil this dream. The most easy one is to get IKEA’s Expedit bookcase. Its shelves are perfect for the task and you really don’t need to do anytinng with it. There are four colors available and you can combine several such bookcases if you have a lot of space and need to accomodate a LOT of shoes.Wednesday, March 30, 2011
DIY-Kasse med hjul


God kveld!
Siden vi har lite hyller og oppbevaringsmuligheter i stuen, oppbevarer jeg kokebøker og interiørbøker i en gammel kasse som jeg har satt på hjul på.
Billig, enkelt og stilig...
How To Make an Easter Egg Tree
I have to share this easy and fun DIY project - How to Make an Easter Egg Tree found on Fresh Home Ideas. Click here for step by step instructions. Be sure to pick up the new Spring 2011 issue of Fresh Home magazine as well.

Wednesday, March 23, 2011
DIY ~ Mismatched Chairs
Check out the ideabook by Brian Flynn on the Houzz - DIY Mismatched Chairs.
I have always wanted to give my dining room some of that "Wow" factor,
and this idea will do the trick... and where can we get that cute doggie?

Wednesday, March 16, 2011
DIY ~ Floral Arrangements in Fruit
Here is a wonderful DIY project ~ making a sweet floral arrangement by using real fruit as your container. How fun, simple and affordable! I just love this post on Ada and Darcy today and had to share it with you! If you are not familiar with Kellie's blog, go visit.

1. Select a large fruit or vegetable that will hold your variety of flowers. Cut the very top off of fruit or vegetable with a knife.
2. Carve a 3 inch round/deep opening in fruit or vegetable.
3. Carve floral foam to fit inside of votive holder.
4. Put floral foam inside of votive holder and place into the fruit or vegetable opening.
5. Pour water into votive holder.
6. Snip the stems of flowers and arrange them however you like and stick them one by one into the foam.


Friday, March 11, 2011
Cute Bookends Inspired By Owl Bookends | DIY
These cute bookends are inspired by owl bookends you can find at Pottery Barn but are really cheap to make. First of all you need to made a patter for the owls and cut out the fabric for them. Felt would work like a charm for the eyes while flannel would be as good for the wings. Next you need to arrange everything together and sew it then together. To finish you need to stuff them together and put rice at the bottom to weigh them down. Enjoy these little cuties!


Monday, February 21, 2011
Footstool in Schumacher’s Chiang Mai Dragon Fabric
A few months back, I won a remnant of Schumacher’s fabulous Chiang Mai Dragon fabric in aquamarine from Mr. Goodwill Hunting {great blog - I’m a fan - you must stop by!}.

This fabric is so beautiful {not to mention pricey}. I was nervous and didn’t want to ruin it. Therefore, it sat idle until I could find the perfect application.

This sweet footstool with brass curved legs was stolen purchased for $2 at a local estate sale last summer. This was it. It needed a new life.

With a pair of scissors and a staple gun, I transformed the once tired footstool. It 's now so Chinoiserie chic. I love it. I hope Mr. Goodwill Hunting approves too. Do you?
Hopping over to Miss Mustard Seed's furniture blog party... will you join me?
Hopping over to Miss Mustard Seed's furniture blog party... will you join me?

Wednesday, February 9, 2011
And the Winner is…

Today I am very excited to announce the winner of the Cutting Edge Stencils giveaway! Comment #52 from Allison was selected from random.org. Congratulations Allison, you have won a $40 gift certificate at Cutting Edge Stencils!


{Clematis Stencil from Cutting Edge Stencils via Centsational Girl}
Reusable wall stencils are an emerging hot decorating trend and are very popular amongst style-savvy DIY decorators. Interested in doing a stenciling project in your home? Visit Kate’s Centsational Girl blog to get inspired and learn priceless tips on wall stenciling from some very talented and crafty bloggers.
Congrats again to Allison! And a big thank you to Cutting Edge Stencils for sponsoring this giveaway! Be sure to drop by their online store to see the largest selection of stencil patterns around.
Stay tuned… there will be another fabulous giveaway next week!
Saturday, February 5, 2011
DIY ~ Make Your Own Valentine's Day Cards
Nothing is more personal than a handwritten note, so why should Valentine's Day be treated any differently? Show someone you care by making your own Valentine's Day cards. Get your construction paper, felt, scissors markers and glue... add some stickers, glitter, stamps, paint brushes and paint... and go to town! I promise you will have fun!


Related: Love Birds on a Wire ~ a watercolor painting
DIY Paper Rose Wreath via Shelterness
photos: flickr, martha stewart, family fun
Wednesday, January 19, 2011
DIY ~ Make Your Own Plush Owls
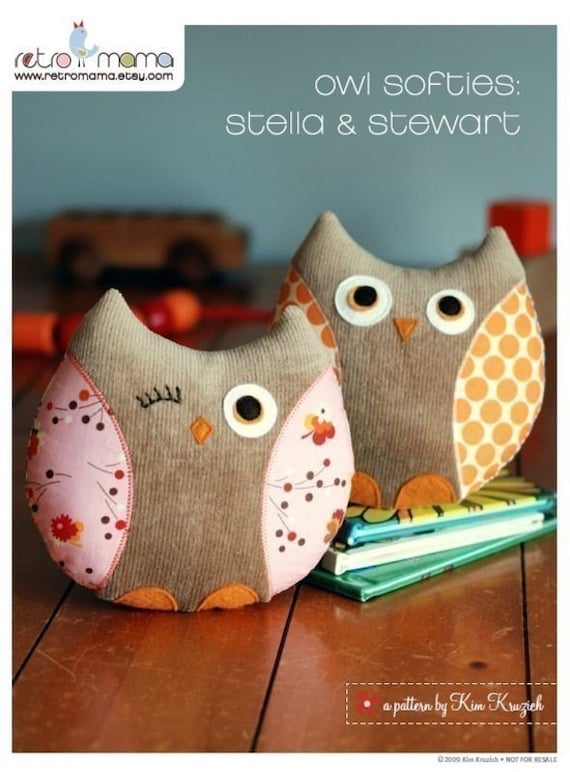
I wish I was more of a seamstress, because Stella and Stewart, the cool couple above, are adorable! Hoot hoot! Purchase a PDF sewing pattern for making these sweet plush owls from the Etsy shop: Retro Mama. Includes instructions to make a plain or patchwork back and several options to personalize your owl face. Finished owl measures approximately 7".
More DIY and How To blog posts and More ways to follow BB&B
Did you enter?
Monday, January 17, 2011
Monday Inspiration
"Those who bring sunshine into the lives of others, cannot keep it from themselves." James M. Barrie

photo: pinterest
What a great idea for a DIY project!
Thursday, December 30, 2010
My Favorite Design Blog Posts of 2010
It’s hard to believe 2010 is coming to an end soon. Seems like just yesterday I wrote a post about my favorite blog posts of 2009. With more and more beautiful design blogs, it was very difficult to narrow down my favorites for 2010, but here goes {in no particular order}…

Holding Court’s How to Find Inspiration Shopping. The design blogging community continues to morn the loss of Marija who was killed in a car accident returning from an antiquing trip to Atlanta on July 10, 2010. My heart goes out to her family and friends this holiday season.

Pure Style Home’s Our Thanksgiving Table. This fun post by Lauren represents her wonderful whimsical, eclectic style to a T.

Isabella & Max Rooms’ Kitchen Island Pendant Project. In this post, the multi-talented Janell shows us how to make a custom drum shade for a pendant fixture. Aren’t this beautiful?

Cote de Texas’ The Hottest Photographer Going. Joni’s posts are always informative and beautiful. This is no exception. She walks through who Candida Hofer {the hottest photographer} and why she has attracted the attention of so many of the finest interior designers and art collectors. {image above from Town & Country via Cote de Texas}


Centsational Girl’s Laundry Room Project Breakdown. Well, it was hard to pick just one post of Kate’s. She has some many great ones this year. However, her laundry room face-lift is a favorite of mine.

Bright.Bazaar’s Rue Magazine: My Holiday Column. Will’s column for Rue Magazine is always a treat. I especially like his holiday where he captured three different Christmas looks in the same room … all in one day!

6th Street Design School’s Office Details. Kirsten’s pretty and functional home office was designed with items from all different sources – many at deep discounts. Love that!

A Brooklyn Limestone in Progress’ Mail Call! DIY Mail Center. Stephani has tons of inspirational DIY projects on her blog, but the organizer side of me loved this incoming mail sorting center she made using picture frames and radiator grill. Brilliant!

Things That Inspire's Kitchen Sinks and Sink Tips from Readers. Holly is in the midst of building her dream home in Atlanta. She blogs about all the big and little decisions that she is making throughout the process. In these posts she walks through images of kitchen sinks and highlights readers’ advice regarding a variety of sink designs. Great ones to bookmark!

Velvet & Linen’s Leila’s Room. Brooke’s daughter, Leila’s new “big” girl room is eclectic, colorful and inviting. Starting with an floral rug from Anthropologie, Brooke & Leila created a beautiful bedroom retreat.
There are so many other posts I enjoyed reading in 2010. The lovely blogs listed under "buzzing blogs" are my daily reads. Please check them out when you have the time!
If you have areas of design or organization you'd like me to cover in 2011, just drop me an email - simplifiedbee {@} yahoo {dot} com.
Thank you for reading Simplified Bee and wishing you a joyous 2011!

Thursday, December 23, 2010
"No Peeking" Holiday Gift Tags
Today I am busy busy wrapping away, but just took a few minutes to browse the net and found these adorable and free printable "No Peeking" holiday gift tags from paper Crave ... how cute!

How about you? Are you finished shopping, wrapping, and baking? Later on we are making cupcakes... yummm... I love the holidays!
Don't miss out!
** $100 CSN Stores Giveaway - enter by Christmas Eve! **
** $40.00 gift certificate to Friedasophie Jewelry Design - enter by Christmas Eve! **
Submit Your Favorite Blog post of 2010 from Your blog
Monday, December 13, 2010
Beautiful {and Simple} Ideas for Displaying Christmas Cards

Receiving Christmas cards from family and friends is one of the big highlights of the season. We collect and display ours in a vintage wicker sleigh. And we have done it this way for several years. But after researching this post for a Simplified Bee reader who asked for creative ideas for displaying holiday cards, we might have a different approach next year.

Here is a simple and elegant way to display holiday card using an existing mirror. Martha Stewart used Lametta tinsel to create three swags perfect for hanging season’s greetings.

Using a picture frame and twine, holiday greeting cards are displayed beautifully with other festive décor. Thank Country Living for this idea!

Hang Christmas cards along a fireplace mantel with twine and colorful clothes pins. So simple! DIY or purchase a kit on Folksy.

With a little ribbon crisscrossed, this cabinet becomes a wonderful place to display cards. Brilliant idea found via Living Livelier.

Hanging cards on a door with decorative ribbons is also a fun idea. Here is the how to via Country Living.


Happy Holidays!
Subscribe to:
Posts (Atom)


